Another Chapter / Ett nytt kapitel

You will all have seen that I haven’t been very active with blogging lately. The reason is that I have been very busy with building a company instead. www.ericssonautomobile.com The company is dedicated Volvo P1800, and it is my new outlet for my passion for those lovely cars.

IMG_2678

If you like to follow the journey, you can subscribe to news on the new website. There will be a lot of news, videos, great pictures like the one above, curtesy of Roberth Stenberg in Sweden. Have a look!

www.ericssonautomobile.com

Ni trogna läsare har säkert märkt att det inte varit så mycket uppdateringar på denna blogg på sista tiden.  Det beror på att jag varit fullt upptagen med att bygga upp mitt nya företag som också handlar om P1800. Besök gärna den nya hemsidan och prenumerera på nyheter så du kan följa med på resan.  det kommer att bli intressant innehåll och många fina video och bilder, som bilden ovan av Roberth Stenberg.  Ta en titt!

www.ericssonautomobile.com

More Welding / Mera svetsning

Although I haven’t been posting anything on this blog for a little while, we have made a lot of progress in the garage. Clint and Steve have been working 215 hours on the car since the new year and my previous blog post; mostly unpicking panels, cleaning, making new panels, repairs and welding well as priming various eras. I will try to summarise those works in the coming posts to bring you up to speed. Hopefully I should be in a position to blog a bit more frequently as of now.

Anyhow, below is the starting position. Underside of the body and the interior in primer and the rear of the body almost done. There were a few things in the front though , that we were concerned about. Damages from the Moose accident, decades ago, to the bonnet hinge panel and front chassis legs; we wanted to take off both front wings to have a good look at what the previous garage had done to make sure there was no rust; replace the previously repaired N/S front wing with a new NOS wing I had bought so that we get both front wings replace with new; I wanted also to take off the scuttle panel to clean out any rust that we might find under it; and finally put the car in the jig, measure and pull if needed.

IMG_1897

IMG_1899

Även om jag inte hunnit blogga sedan nyår så har det inte stått stilla i garaget.  Clint obj Steve har jobbat 215 timmar på bilen sedan nyår och min senaste blogg post. Plockat isär karosssektioner, rengjort, tillverkat nya karosssektioner och reparerat och svetsat samt grundmålat. Jag ska försöka att summera dessa arbeten i den kommande blogg posterna. Förhoppningsvis kommer jag att kunna blogga lite oftare framöver.

Nedan är utgångsläget i början på året. Undersidan och insidan var klara och grundmålade och bakdelen på bilen var i stor klar. Det var fortfarande några saker i fronten som bekymrade oss.  Skador från älgkrocken för flera decennier sedan, panelen där motorhuvens gångjärn är fästa och främre chassi benen. Vi ville även ta av framskärmarna igen för att kunna kolla vad den förra verkstaden jag anlitade hade gjort och försäkra oss om att det inte var någon rost kvar där. Byta ut den tidigare lagade vänstra fram skärmen med den ny NOS skärm jag fått tag på så det blir två nya framskärmar.Jag ville också lyfta på panelen där friskluftsintaget sitter under framrutan för att rengöra från den rost som kan finnas där. Det var den sista slutna sektionen som vi inte öppnat. Slutligen sätta bilen i en mät jig och dra den rätt om den behöver justeras.


Finally starting to apply primer/Till slut har vi börjat grund måla

Final cleaning of the inside and the floor before applying the primary coat. Quite a hard work as the car was stripped to bare metal over a year ago and all little surface rust that has appeared since has to go. The good thing (although quite time consuming) is that we have cleaned the car a few times during this time.

After that base coat was applied under the car…

img_1784

…and to the inside.

Vi har gjort rent flera gånger under bilen eftersom det är över ett år sedan karossen gjordes plåtren.  Nu har vi gjort en slutlig rengöring (noggrann, all ytrost måste bort) under bilen och inuti, innan vi grund målade. 

Some inspiration / lite inspiration

After a few years of restoration work, it was very inspiring to see this video of a nicely restored P1800 -66 in the same colour as mine. Enjoy!

https://m.youtube.com/watch?v=lQ90-2na_cQ

Efter några års arbete med min restaurering, var det väldigt inspirerande att se denna video av en fint restaurerad P1800-66 i samma färg som min.

Transmission tunnel / transmissions tunnel

When talking to one of the previous owners, Anders Kåhrström who owned that car during 27 years, he told me that the car  have had a coalition with a Moose.

moose

När jag pratade med Anders Kårström, en av de tidigare ägarna, som hade bilen under 27 år, berättade han att bilen varit med i en krock med en älg.

We have seen evidence of this coalition when restoring the car. A further indication was that the car was owned by an Insurance company, Zurich, for about a year in 1971-72 and  I would have thought that this may well be due to the collition. When the front was replaced there was a lot of filling and when removed it was clear that the from have had quite a beating. The front floor panels that are in an angel up to towards the engine compartment as well as the engine compartment itself had aslo sims of a mighty impact, as did the transmission tunnel.  This has all bean dealt with with exception of the transmission tunnel. After posting on P1800 Face to ask if some one had a transmission tunnel for sale, and receiving offers between £100 (in Sweden) and £300 (in Denmark) we decided to take out the one I’ve got and repair it.  The other two on offer where good solid metal, however they needed many hours of cleaning as they appeared to have 50 years of undersea and vax on them.  The fastest route seemed to be a repair. This turned out to be the right decision as the disassembly, repair, cleaning and re-fitting took only 13 hours. Replacing it and cleaning another transmission tunnel is likely to have taken more time.


img_1538

img_2874

Vi har sett flera spår av detta när vi restaurerat bilen.Bilen ägdes också av Zurich försäkringar under ett år 1971-72 vilket troligen hade med denna kollision att göra. När vi bytte ut fronten såg vi att den vara rust illa sönderslagen under all fyllning. Fram golvet där det går upp i vinkel mot motorrummet var också ganska buckligt, liksom delar av motorrummet och kardan tunneln. Allt var nu åtgärdat förutom kardan tunneln. Jag la ut en fråga på Face Book om det fanns någon tiosalu och fick två erbjudanden, en från Norrland på 1200kr och ett från Danmark på EUR300. Efter ett tags funderande bestämde jag mig för att ta ut den jag hade och reparera dem. De andra två var visserligen solid metall, men de hade också 50 års underredsmassa och fordrade många timmars rengöring.  den snabbaste vägen skulle därför vara att reparera.

Det visade sig vara rätt beslut för det tog bara 13 timmar att demonterad tunneln, rengöra, rikta och svetsa och snygga till.  Sannolikt hade ett utbyte tågot minst lika lång tid.


Is there no progress on the welding of the body? / Händer det inget med kaross svetsningen?

I just realised that I haven’t posted an update about the welding of the body for quite a while. In fact, the last post about the body welding was over a year ago Blog post about the body from May 2015 (opens in a new window). There is a lot of work that has been done on the floor and we should soon be ready to paint!  I hope…

The reason for the long delay are many:

(1) The garage  I use, Castleman (Opens in a new window) have changed ownership and the guys have been busy with improving the workshop and upgrading the bodyshop machinery.

img_0581

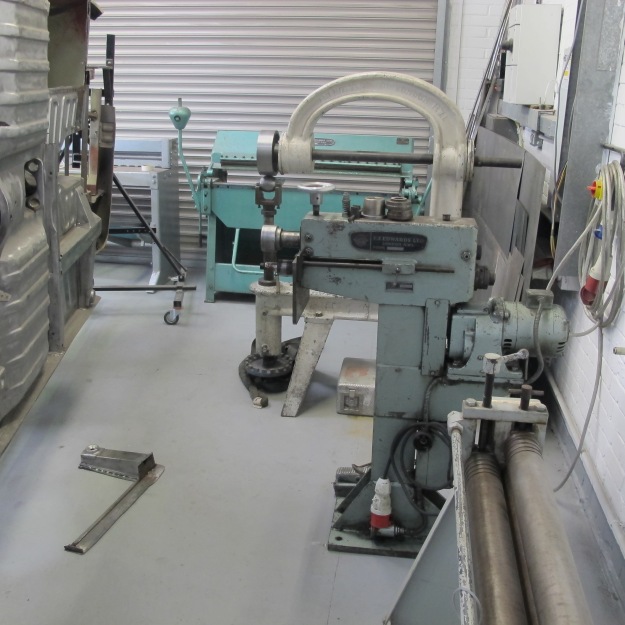
With those new machines you can do pretty much anything, from the front to the rear: Bending Roll, Bending Roll (or Bead Roller), English Wheel, Boxing Pan (the green one) and Guilioteen (to the left)

(2) I have not been able to find any reliable reviews with proper test results for the various methods for applying a rust protective base coat. There are different views about what is the best: 2 Pack Epoxi, Etch Primer, e-coating, Zink-based products and some firms even suggest they can galvanise thin panels (!). I have therefore decided to do a proper 2000 hours  Salt Spray Test to satisfy myself what is the best way forward. 2000 hours is a long time so the test ran over three months plus preparations and was run by a professional laboratory in accordance with the ASTM B117 standard. We did the tests using 50 year old mild steel car panels to get the results as relevant as possible for a classic car restorer. I have also visited a number of firms providing rust protection services in the UK. I will write a dedicated blog post about the Salt Spray Test later on.

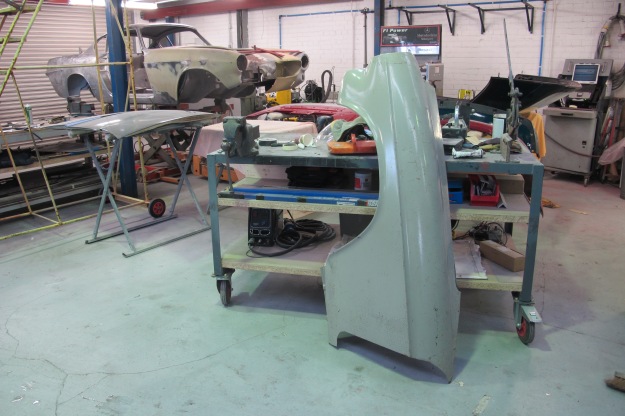
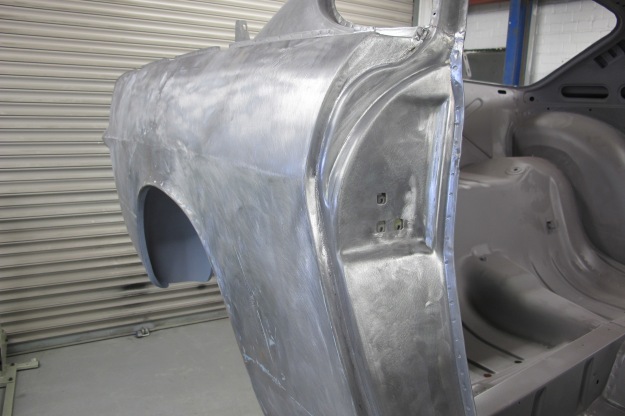
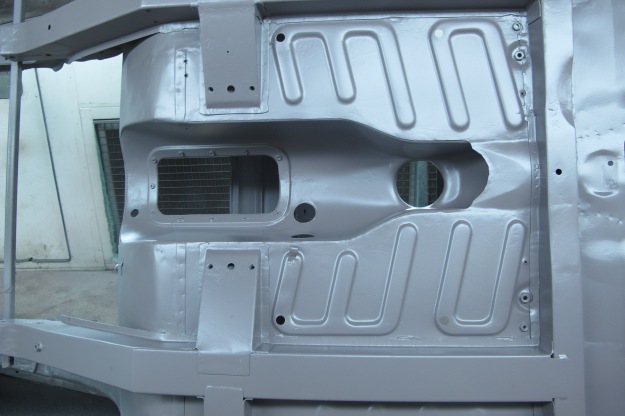
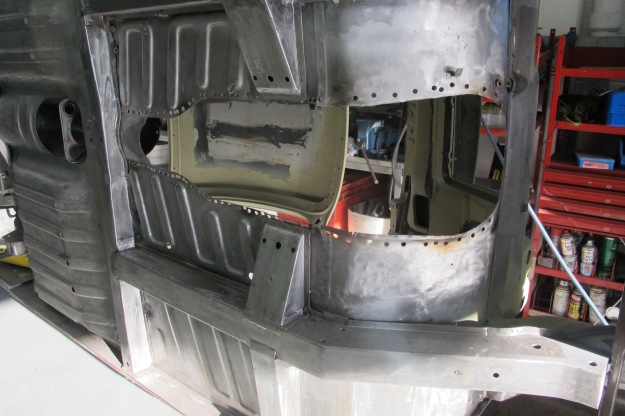
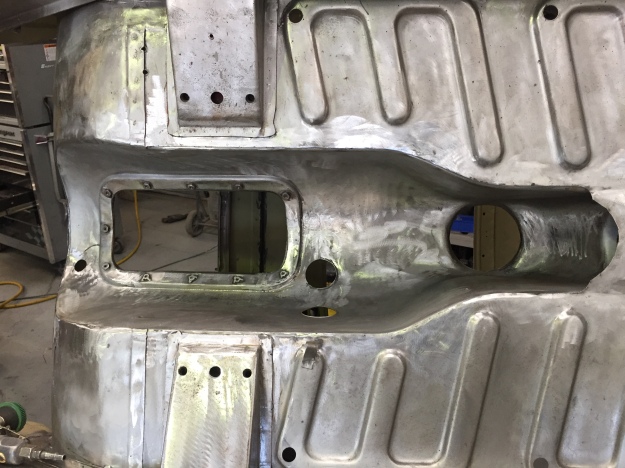
(3) There was quite a bit of work with the welding of the floor. A few panels have had to be made up, some others have been bought, some panels that had been replaced by the previous garage had to be replaced as they where not properly fitted. And cleaning, cleaning cleaning! I am very happy that we have opened up all box sections in the floor and cleaned them and treated them. As you can see from the pictures below there was hidden rusty, panel on panel welding, when the outrigger was opened. The plan is now to drill an inspection hole in all box sections in the floor so that we , now that it is clean, can apply the rust protective base coat with a special spray gun, as well as rust protect it with wax or similar.  I will always be grateful to Clint and the Castleman team that the insisted that we should strip the underside of the car again as he felt quite suspicious about the quality of the previous garage’s work.  I am glad we did because it revealed so much that needed reapir and cleaning. Imagine if I had not one this and after spending ten’s of thousands of Pounds on the more visible parts of the car, would have been faced with the new rust repairs  would have continuously been needed on the floor.  It is again confirmed to me that when restoring a classic car, every square millimeter needs to be checked, cleaned, repaired, replaced or treated. There are no shortcuts!


Refurbished Steering Wheel / Renoverad ratt


My Steering Wheel had a few very ugly cracks, about 3mm each, on the wheel, and the wheel looked quite worn after over 50 years, so something had toa be done. I got in contact with Per Jensen at Lallas in Sweden http://lallas.eu as they remould steering wheels so they become as good as new again. That sounded interesting but I was a bit doubtful about their process; using transparent plastic when remoulding the wheel and then paint it black.   Per said they where planning to start moulding with black plastic, so that the wheel i coloured black throughout. He suggested that they could test the process on my steering wheel if I wasn’t in a hurry to get it back quickly. I thought hat was a great idea and sent off the wheel to Per and Lalla so that I could have it back before the end of August when I was going back to England again.  Per called a few days before my departure and said that as this was the first steering wheel with this new process, and as there was a few imperfections from the moulding, it was a lot of work to remedy and polish  my steering wheel. He was however hopeful that they should be done after the weekend. After a couple of minutes Per called again to say that I shouldn’t be surprised that there will be no indentations for the thumbs when I get my wheel back.  Those come from wear and was never there when the car was new. Interesting, I had never thought about that.

After the weekend Per called again and said that the steering wheel was done and ready to be shipped. They had spent all in all well over 50 hours (!) to get a perfect finish on my steering wheel. When I got it, I was very pleased indeed, the end result was perfect (as one could see from the pictures below) and I couldn’t see where they had spent so much time. It just looked right and brand new. I’m always very impressed when people are prepared to take som much trouble to achieve a perfect end result, even if it results in a lot more work for them. It’s about being proud of one’s job, and that’s something to take care of!

img_1027img_1028

Min ratt hade ett par fula sprickor på rattkransen, ca 3mm stora och som löpte runt randkransen. Dessutom var ratten ganska medfaren och skulle se trött ut på bilen, så något måste göras. Jag fick kontakt med Per Jensen på Lallas utanför Karlskoga http://lallas.eu och han berättade att de gjuter om rattkransarna så att de blir som nya igen. Det lät intressant men jag var lite frågande inför att ratten skulle gjutas transparent och sedan lackas svart. Per berättade då att de planerade att börja gjuta i genomfärgad plast och erbjöd mig att min ratt kunde få bli försökskanin om jag kunde vara av med ratten under någon månad eller två. Det nappade jag förstås på, och ratten skickades till Per och Lalla så att den kunde bli klar under Augusti innan jag åkte tillbaka till England. Avresa dagen närmade sig när Pär ringde och berättade att eftersom det var första ratten med denna nya metod och eftersom det hade uppstått lite luftporer i gjutningen så var det massor av jobb att fylla dessa och polera. Han hoppades att de skulle blir klara under helgen som kom. Efter en liten stund ringde Per igen och sa att det kommer inte att vara några fördjupningar för tummarna på ratten. Det är många som saknar dem når de får tillbaka en omgjuten ratt, men de var inte där när den var ny utan har uppstått genom slitage.

Efter helgen ringde Per igen och berättade att de hann klart och var redo att posta ratten till mig. Det hade tagit dem över 50 timmars arbete med min ratt (!) för att få den perfekt. Jag kan bra hålla med. Ratten var verkligen jättefin när jag packade upp kartongen, som framgår av bilderna ovan. Jag är helnöjd. Jag kan inte se vad det är som de har jobbat med att få bort – utan allt ser perfekt ut. Det är imponerande tycker jag när folk är så noga och måna om ett perfekt slutresultat även om det innebär jättemycket mer jobb för dem. Det handlar om yrkesstolthet och det är något av vara rädd om! 

Color and Upholstery / Färg och klädsel

As I have not found any website with an overview of which Color and Upholstery combinations that was offered in a particular year, I have done a bit of analysis and posted i a separate chapter Color and Upholstery Codes on this blog.  Please have a look and send your comments in.

p1800 66 bild 3

Eftersom jag inte har hittat någon annan website med en översikt av tillgängliga färg och klädsel kombinationer från fabrik för de olika åren, så har jag gjort en del research pct analys, och skrivit ett separate kapitel på denna blogg.  Color and Upholstery Codes på denna blogg. Ta gärna en titt och kommentera!

Rear Brake Reduction Valve / Bakre broms reduktions ventil

I’m a bit cautious when it comes to restore brake components myself. But I couldn’t find anyone who was restoring those reduction valves so I tried to find a reapir kit instead,  273104-0 for the 1-circuit valve in the parts catalogue. It turned out that no-one offered that repair kit anymore, only the repair kit for the 2-circuit valve 273090 (the strange thing was that both the 1- and the 2-circuit one’s had repair kit 273104-0 in the pars catalogue, but VP-Autoparts as an example writes that their kit doesn’t fit a 1-circuit). Anyhow, I ordered one of these just to have a look and it turned out that the gasket, which was the most important part to get, worked fine also on the  1-circuit valve. As you can see from the picture below, there was a few parts that wasn’t needed, but other than that it was pretty straight forward.

Jag är lite försiktig när det gäller att restaurera bromsdelar själv. Men jag kunde inte hitta någon som renoverade dessa reduktionsventiler, så jag blev tvungen att göra det själv, och försökte istället att få tag på en reparationssats, 273104-0 för 1-krets ventilen i reservdelskatalogen. Det visade sig dock att ingen sålde dessa, bara reparationssatsen 273090 för 2-krets ventilen. Det konstiga var att i reservdelskatalogen var det samma artikelnummer 273104-0 för både 1-krets och 2-krets reducerings ventilerna, men VP- Automats uppger att deras kit för 2-krets inte passar 1-krets). Iallafall beställde jag en sats och det visade sig att den viktigaste delen, packningen, passade bra. Som ni ser på bilden så blev det några delar över som inte behövdes på 1-krets. Förutom detta var det ganska straight forward.